“The pelvis as the bowl of balance: awareness, strength, and ease.”

Recently, I experienced a lower back injury, most likely involving inflammation around the sacroiliac joint and this inspired me to look a bit deeper into the pelvis positions.
first image second image third image
The pelvis is the centre of the body. It connects the spine to the legs and plays a big role in posture, balance, breathing, walking, and how we move during yoga. When the pelvis is well aligned, the spine can lengthen more naturally, the hips feel freer, and the lower back is less likely to become overloaded.
The pelvis can tilt in different directions:
Anterior pelvic tilt
The front of the pelvis tips forward. This often increases the curve in the lower back and may make the ribs flare or the belly relax forward.
Posterior pelvic tilt
The pelvis tucks under. This can flatten the lower back and sometimes create tension in the hips, hamstrings, or lower spine.
Neutral pelvis
The pelvis is balanced between these two positions. The lower back has a natural gentle curve, the ribs sit more easily over the pelvis, and the body feels more stacked and supported.
In yoga, we are not trying to force a perfect posture.
Instead, we are learning to notice, adjust gently, and move with awareness.

How to become aware of your pelvis in class
During standing poses, notice:
Are your ribs stacked over your pelvis?
Is your lower back strongly arched or completely flattened?
Are you gripping your glutes or locking your knees?
Do you feel your weight more in your toes, heels, or one side of the body?
During poses such as Mountain Pose, Warrior poses, Chair Pose, Bridge, Cat-Cow, and Downward Dog, explore how small pelvic adjustments can change the feeling in the spine, hips, and legs.
*A simple cue to try:
Place one hand on the front of your pelvis and one hand on your lower back. Slowly tilt your pelvis forward and backward. Then find the middle point where the spine feels long, the breath feels easy, and the legs feel grounded.
How to check your own standing position
Try this at home in front of a mirror:
Stand with your feet hip-width apart. Let your knees stay soft, not locked. Feel your weight spread between the heel, big toe mound, and little toe mound. Imagine your pelvis as a bowl of water. If the bowl tips forward, water spills out the front. If it tucks under, water spills out the back. Aim to keep the bowl level. Allow your ribs to soften down over your pelvis. Lengthen through the crown of your head without stiffening.
You may also stand sideways near a mirror and check whether your ribs, pelvis, knees, and ankles feel roughly stacked. The goal is not rigid alignment, but a relaxed, balanced posture.
Sitting habits: cross-legged and asymmetrical sitting
Many of us sit with one leg crossed, one foot tucked under, or always lean to the same side. This is normal, but if we do it for long periods every day, the body may adapt to that pattern.
Asymmetrical sitting can sometimes create:
Uneven weight through the sitting bones. Ones hip feeling tighter than the other Pelvic rotation or side-shifting habits. Lower back or hip discomfort. Reduced awareness of neutral alignment
When sitting, try this:
Sit evenly on both sitting bones.Keep both feet grounded when possible.Change sides if you cross your legs.Avoid always crossing the same leg on top.Take short movement breaks.Notice whether one hip feels heavier or more lifted.
In yoga, we can use seated poses as a chance to observe whether we are collapsing into one side or lengthening evenly through both sides of the waist.
Becoming aware in your own body
During yoga class, I invite you to gently observe your pelvis.
In standing poses, notice:
Are you locking one knee? Are you shifting your weight into one hip? Is your pelvis tipping forward and increasing the lower back curve? Are your ribs lifting away from your pelvis? Can you soften and return to a more balanced position?
In seated poses, notice:
Do you always cross the same leg? Are you sitting more heavily on one sitting bone? Is one side of your waist shorter than the other? Can you sit with both sitting bones grounded and the spine gently rising?
In yoga asanas, notice:
Are you over-arching the lower back to go deeper? Are you gripping the glutes or belly too hard? Are you forcing the hips open? Can you reduce the intensity and still feel present?
These questions are not about judging the body. They are about listening.
I invite you to practise with curiosity rather than ambition. Let the breath guide you. Let the body give feedback. Let the pelvis become a place of awareness rather than tension.
May we all find more space, more patience, and more kindness in the way we move.
Simple exercises to support a healthy pelvis
A stable pelvis needs support from the glutes, deep abdominal muscles, hip muscles, pelvic floor, and spinal stabilisers. These simple exercises can help build awareness and strength.
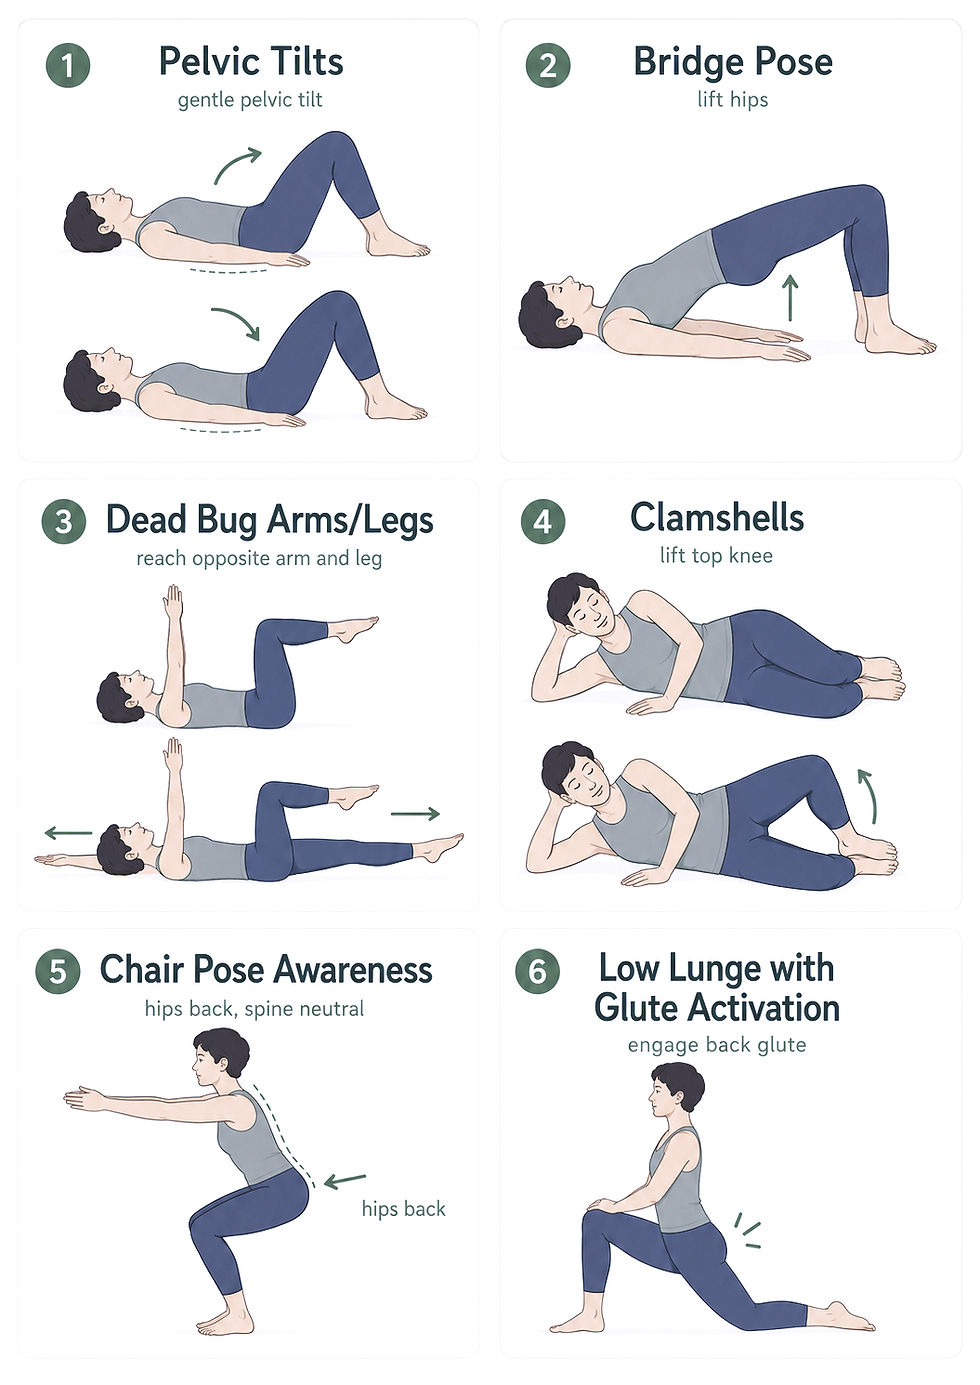
1. Pelvic Tilts
Lie on your back with knees bent and feet on the floor. Gently arch your lower back, then gently flatten it. Move slowly and notice the pelvis tipping forward and backward. Repeat 8–12 times.
This improves awareness of pelvic movement.
2. Bridge Pose
Lie on your back with knees bent. Press through your feet and lift your hips. Keep your knees pointing forward.Avoid over-arching the lower back.Slowly lower down.
Repeat 6–10 times.
This strengthens the glutes and back body.
3. Dead Bug Arms/Legs
Lie on your back with knees bent over hips.Gently draw the lower ribs down and keep the pelvis steady.Slowly lower one heel or one arm, then return.Avoid letting the lower back arch excessively.
Repeat 6–8 times each side.
This strengthens the deep abdominals and improves pelvic control.
4. Clamshells
Lie on one side with knees bent.Keep the pelvis still and lift the top knee slightly. Do not roll the body backward.Lower slowly.
Repeat 8–12 times each side.
This strengthens the side glutes, especially glute medius, which helps pelvic stability.
5. Chair Pose Awareness
Stand in Mountain Pose.Bend your knees as if sitting back into a chair.Keep your knees soft and your pelvis balanced.Notice whether your lower back arches strongly or your pelvis tucks under too much.Find a middle position and breathe.
Hold for 3–5 breaths.
This teaches pelvis control in a functional standing position.
6. Low Lunge with Glute Activation
Step one foot forward into a low lunge.Gently lengthen the tailbone down.Lightly engage the glute of the back leg.Feel the front of the hip open without collapsing into the lower back.
Hold for 3–5 breaths each side.
This helps balance hip flexor mobility with glute support.
"Breathe into the pelvis—let it expand, let it relax".


Comments